
Cleaning Your Clarinet after Playing

Disassemble your clarinet. Handle each piece with your fingertips to avoid transferring your hand’s oils to the clarinet’s wood. Take caution not to bend the keys while taking the clarinet apart. Place each piece in a safe place where it will not be damaged.

Remove the reed after playing and store it in a reed holder to dry. Put the rest of the clarinet in a safe place that is not too hot or too cold. Don't stand it on its end unless you have a clarinet stand (it holds your clarinet upright, and can usually be folded and stored in the bell).
Use your polishing cloth to wipe fingerprints off the ligature and keywork. Polishing with a microfiber cloth will keep the acids and oils from damaging the instrument. Carefully place the cloth back in your case. Don't use any kind of metal polish or other substance on your instrument, except for key oil and cork grease. Pay close attention to the tone holes that your fingers cover as they often collect gunk and grime from your fingers.

Clean your mouthpiece with a small brush. An unclean mouthpiece can become unsanitary and negatively affect your health if ignored for too long. An unclean mouthpiece could also shrink, negatively affecting the instrument's tone. Using your brush and warm water, gently remove buildup from the mouthpiece, drying it with your microfiber cloth.
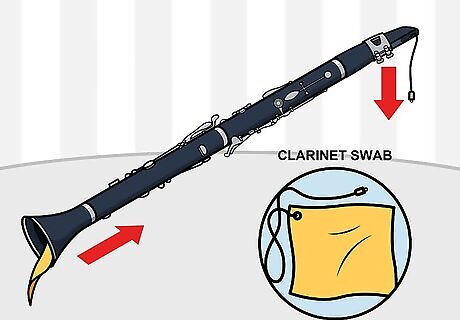
Swab each part of the clarinet. In order to remove moisture from inside your clarinet, use your swab and drop the cloth's weight and string through the clarinet from the bell to the mouthpiece and pull it through. If your cloth gets stuck pull harder , don’t worry it won’t ruin your clarinet. You may have to do this several times. Take the pieces apart and dry the tenons (these are the places where the joints of the horn fit together). Then, let the swab dry before putting it in the case, otherwise your keys will be discolored.
Place the clarinet back in its case. After cleaning, always return the clarinet to its case in order to protect it from damage. Avoid keeping anything other than your clarinet in the case, for things like papers and pencils can damage the wood once the case is closed. Once your clarinet is safe at home, keep the lid of the case open for an hour to allow the clarinet to dry naturally. If your case is not big enough to hold all of your cleaning supplies, you could purchase a pencil box to hold extra reeds, swabs, and other necessities.
Maintaining Your Clarinet

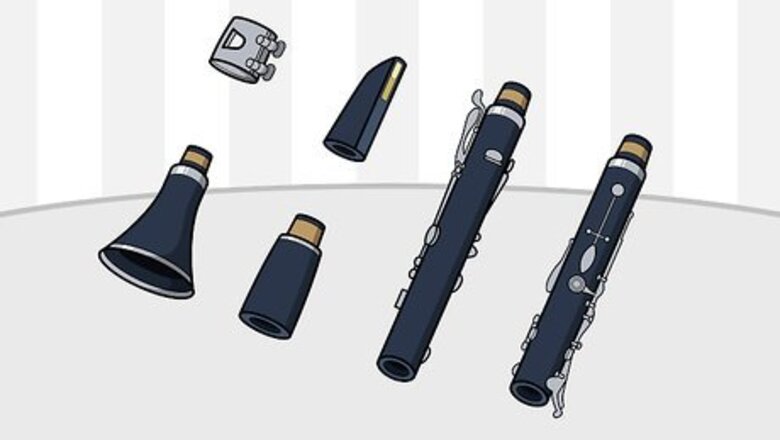
Begin assembling your new clarinet. There are seven different pieces of a clarinet, each with its own vital impact on the instrument’s sound and assembling these parts is essential to proper maintenance. Understanding how to properly assemble your clarinet will ensure that the instrument is not damaged while playing. Follow these steps while treating each piece of the clarinet with care, working from the bottom piece of the clarinet to the top. Twist the bell onto the lower joint. Twist the upper joint onto the lower joint. Align the bridge piece. Twist on the barrel. Twist on the mouthpiece. Carefully put on the reed and secure it with the ligature.
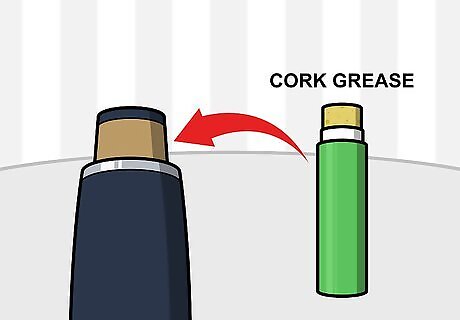
Grease the tenon corks. Grease the corks by rubbing cork grease on them with your fingers. You don't need to do this each time you assemble your clarinet, as too much cork grease will weaken the corks and make them prone to cracking and breaking apart. Grease the tenon corks if the instrument is difficult to assemble in order to make the joints fit together smoothly. You may need to grease them more often in the dry winter months.
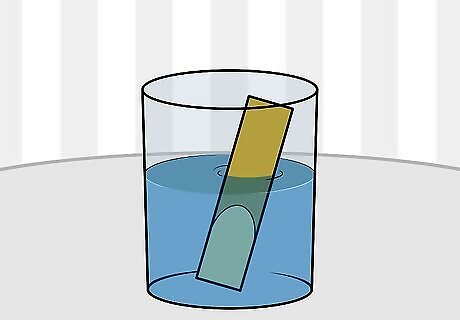
Soak the reed in a cup of water before playing. The reed has the most impact on a clarinet’s tone and is essential to the clarinet’s sound. Be especially careful when handling the reed because it is very fragile. Soak the reed for two-three minutes before each session. Another way to soak the reed is by placing the reed in your mouth for a few minutes, using your saliva to moisten the reed before playing.
Replace the reed periodically. Purchase more than one reed and always have backup. You will know if a reed needs to be replaced if your clarinet sounds out of tune. Replace the reed if it is cracked or damaged. When your reed has turned green this is also a sign you must replace it . Before replacing the reed, soak the new reed for two to three minutes.
Oil the bore of the clarinet every 12-18 months. Purchase oil from a music store to make sure it is the proper type of oil for your clarinet. Apply a small amount of oil to a cotton cloth and pull it through the clarinet while it is assembled. Let the clarinet rest for 15 minutes and then remove the excess oil that was not absorbed by the wood. This ensures that the clarinet will maintain its natural moisture, especially if your are travelling in areas with different humidities.
Be cautious when transporting the clarinet in its case. Although a clarinet case is meant to protect your clarinet, you should still be cautious when transporting the instrument. Avoid bumping the case into walls or dropping it. As most clarinets are made of wood, even a small error when transporting the clarinet can cause serious damage to the instrument. When driving, make sure the case is in a safe and secure place and that it won’t slide around during sharp turns.


Comments
0 comment