
X
Research source
Choosing a Planting Location

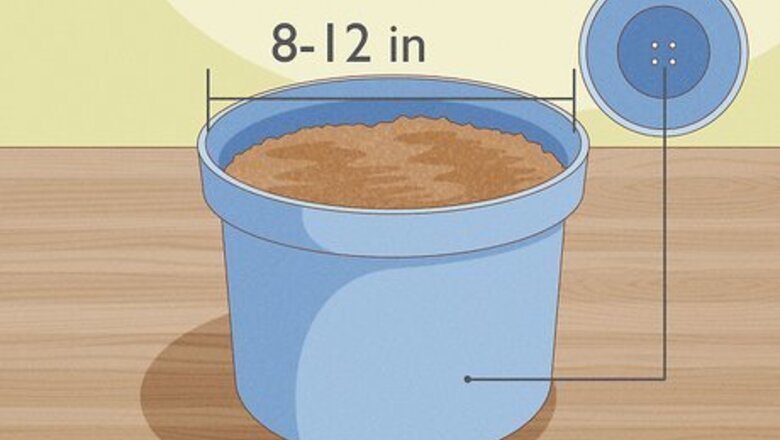
Plant them in a container. Choosing a container with an 8-12 inch (20-30.5 cm) diameter makes it possible for three bulbs to fit comfortably. Look for a container depth similar to a one gallon container, which will give the lilies enough room to establish a solid root system. Look for numerous drainage holes in the bottom to keep the water moist but not overly damp. Placing a few inches of small stones in the base of your planter will keep it from tipping over and aid in drainage.

Plant them in a flower bed. Lilies do well alongside other plants, especially if these companions are of the low-lying variety and do not block out the light. Ground cover plants will retain moisture in the soil and actually keep the lily's bulbs well hydrated. Make sure to keep a minimum of 2 inches (5 cm) between each lily bulb and other plants. Before you plant the bulbs, make sure that the soil in the bed properly drains. Look at the area after a rainfall and see if you notice any super dry areas or spots with standing water.

Give them full sun to partial shade. Aim for your lilies to get at least six hours of direct sunlight each day. It is fine if the area is shady in the morning and then transitions to full sunlight by noon. If your lilies are starved for sunlight, they might fall towards the ground, have few blooms, or die out. Some say that lilies grow best when the soil at their base is shady and their stems and flowers reach into the sunlight.
Planting the Bulbs
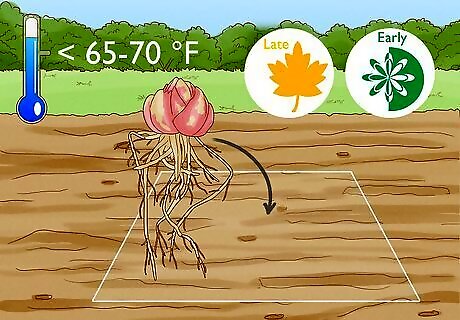
Plant bulbs in late fall or early spring. This will give your bulbs a bit of time to get established before they are tested by the extreme temperatures of winter or summer. If you plant in the spring, it is possible that your lilies will produce blooms almost right away. If you've purchased frozen bulbs from a nursery, set them out for a few hours before planting. This will allow them to thaw out, making temperature shock less likely. Lily seeds can be grown indoors at any time of the year, as long as you use a lighting system. But, they will require that you keep the temperature between 65-70 degrees Fahrenheit (18 to 21 degrees Celsius) during the growing period.

Loosen the soil. Get a trowel to break up the soil at least 12-15 inches (30.5 to 38 cm) in the planting area. Another method is to dig into the soil with your hands, while breaking up any large chunks. Then, sift your hands through the area to make sure that it is broken apart enough. If you are working in a garden space, pull out any weeds or other plants so that each bulb has at least 2 inches (5 cm) or protected surface area.

If you have heavy clay or sandy soil, amend the soil by mixing in compost.

Dig a 6-inch (15 cm) deep hole for each bulb. If the hole is too shallow, then the bulb may gradually become exposed on the surface and rot. The extra inches of soil protect the bulbs from lower temperatures, too. Each hole should be spaced at least 2 inches (5 cm) apart, although more room is even better. If you have a large number of bulbs to place, before you begin digging, take out a piece of paper and create a rough sketch of where you want to place each one. Lilies often look great when you group them into bundles of three to five.

Remove any debris from the holes. Pull out any rocks or hard clumps from the walls or bottoms of the holes. These obstacles can block the lilies from fully growing. Generally speaking, the soil surrounding the hole should be loosely packed, as this will make it easier for the bulbs to take root.
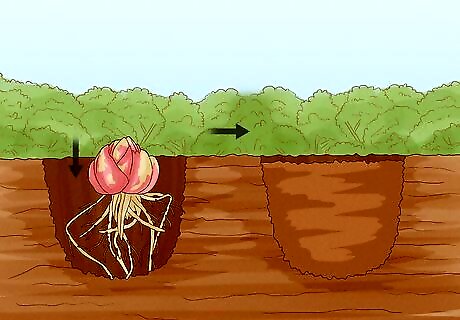
Put a single bulb into each hole. Hold the bulb steady and lower it slowly into the soil. The pointy end of the bulb should be facing upwards. Once the bulb is down, fill the areas surrounding it with extra loose soil. Add dirt until the hole and bulb are fully covered and even with the ground.

Fertilize. Choose a high-potassium fertilizer and apply it directly after planting. Liquid fertilizers are quite easy to use and come premixed or with instructions on how you can attach the container directly to your garden hose. Make sure to apply the fertilizer equally and repeat this process every two weeks until six weeks post-flowering. Be aware that other people choose to add no fertilizer at all and have good results, too. It really depends on the quality of your soil.

Cover the lily bed with a layer of mulch. Once you've fertilized, protect the bulbs even more by adding a few inches of mulch on top of the soil. This mulch will fight against freezing and, if it is cedar, scare away some bugs, too.
Keeping Them Healthy

Water sparingly. Before you water, touch your fingers to the soil and gauge how wet it feels. If the soil is dry, water until the soil feels wet to the touch without water pooling on the surface. If the soil is moist, then it is okay as is. Sopping wet soil is a sign of overwatering or too much rain exposure. Too much water can contribute to bulb rot and make your plant more vulnerable to predators, such as slugs.

Support them with stakes. Some stargazer lilies can grow upwards of four feet tall. This is a sign of good plant health, but it can also lead to drooping and breaking. To protect your lilies from storms and the like, attach each plant to an individual bamboo stake. Use raffia for the ties. For a less expensive natural look, create stakes out of sticks gathered in your yard.
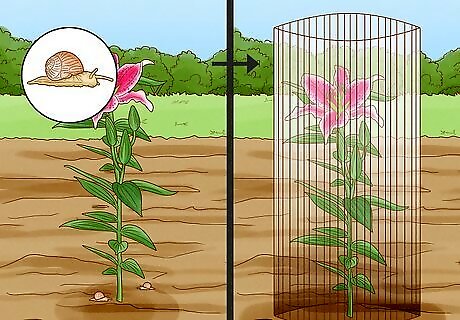
Fend off any pests. Creating an ideal natural environment for your lilies can help to keep them healthy. But, you will also need to be on the watch for animals chewing on your plants or insects, such as snails, taking up residence. Adding wire fence protection and picking off any bugs that you see will help. If you spot aphids on the stems or flowers, spray them off with water.

Trim them back in the fall. If you spot aged flowers on your lilies, go through and cut them off at the stem with a pair of sharp gardening shears. This will keep your plants from using energy on blooms that are clearly dying. Leave the leaves alone and they will turn brown and fall off on their own. On established plants, in the late fall, trim the stalk (also called the stem) down to just above the ground. Since stargazer lilies are perennial, you can expect them to resurface and regrow each year. You may even notice the blooms growing in size each season.

Take care when cutting off any flowers. It may be tempting to trim off a few of the flowers for an arrangement. This is a great idea, but cut the blooms off in the morning when they are the most fresh. To keep the pollen from staining your clothes, make a few snips at the flower's center to remove the stamens. Most lily arrangements will last up to two weeks when placed in a container with regular water changes.


Comments
0 comment