
views
Applying Concrete Sealer and Waterproofing Paint

Remove any salt and lime deposits from your basement walls. Salt and lime deposits are the most common reason sealing fails. Douse a damp rag with muriatic acid and scrub the walls thoroughly. Follow this by rinsing the area very liberally with a water hose, then vacuum it off the floor. This will normally take several applications. You will see the muriatic acid react with the deposits on the wall. Always wear gloves when handling muriatic acid. If you get any on your skin, wash it off with water immediately.

Apply 2 thin coats of concrete sealer with a heavy brush. Regardless of the brand you choose, every 5 gallon (19 L) bucket will cover approximately 100 square feet (9.3 m). Select a ⁄4 inch (0.64 cm) or ⁄8 inch (0.95 cm) roller made with tampico bristles, which are a natural fiber. Work from the bottom of the wall to the top and make sure to apply a thin coat for the best results. Apply the second coat at 90-degree angles to your first coat to allow consistent coverage. All concrete sealers can be used to improve concrete water resistance, although some products are better for this purpose than others. Stick with sealers that are advertised as penetrating and impregnating for the best results. After applying the first coat, wait 2 hours before adding the second. Refer to your specific sealant for drying times. Don't use a roller thicker than ⁄8 inch (0.95 cm) or the application will be too heavy. Try to apply concrete sealer before you finish your basement to avoid making a mess in a finished area.
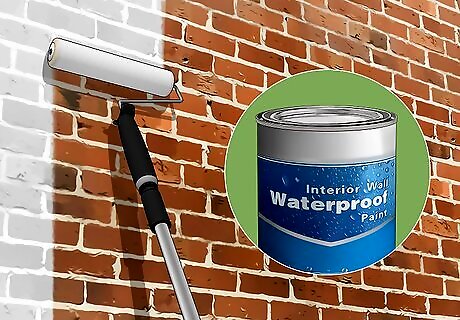
Apply 3 thin layers of waterproof paint for small, intermittent leaks. Dip your roller into the paint 2 to 3 times. Start about 1 foot (0.30 m) from the bottom of the wall and 6 inches (15 cm) from the corner. Roll upward at a slight angle and apply a light amount of pressure. When you get 2 to 3 inches (5.1 to 7.6 cm) from the ceiling, roll up and down and move back to the corner. Keep moving from the floor to the ceiling and move about ¾ of the width of the roller so you overlap each stroke. Continue rolling until you paint the entire wall. Allow the paint to dry for at least 24 hours or according to manufacturer recommendations.
Installing a Sump Pump

Research the parts and function of a sump pump. The primary purpose of a sump pump is to remove water that accumulates in a sump basin. The basin is located in a basement trench that slopes downward. When water accumulates in the trench, it moves into the basin via a pipe, where it is pumped through piping that extends from the top of the basin to the outside of your home. From here, it travels down the slope away from your home. If your basement is unfinished, you can keep the trench filled with rocks and nothing else. But ideally, you should cover it with concrete once you finish your basement. Call a professional basement specialist if you're not up to conduct the installation on your own.
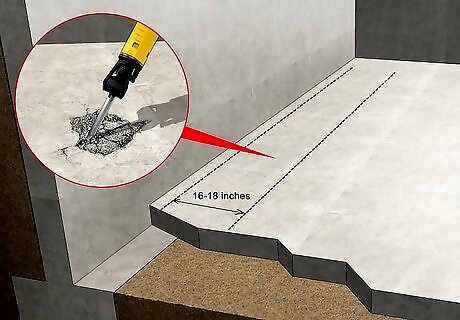
Dig a trench for your sump pump's basin. Start by creating a 16 to 18 inch (41 to 46 cm) line that runs perpendicular to the inside of the basement wall using an electric jackhammer. This will be the width of your trench that holds the sump pump basin. Now, continue removing the patch of concrete flooring of this width along the length of the wall. Now, dig your trench so it's approximately as deep as the bottom of the footing, which are the slabs of concrete directly under the walls of your home. Rent a jackhammer from a home improvement store and use a pointed bit for the best results. Always stand with your feet shoulder-width apart, grip the handles firmly, and hold the tip at a 45-degree angle to the ground. Press down with medium pressure and let the weight of the jackhammer do most of the work. Thrust the shovel straight downward and wiggle it from side to side and forward and backward to loosen the soil. Get on your knees if it's more comfortable.
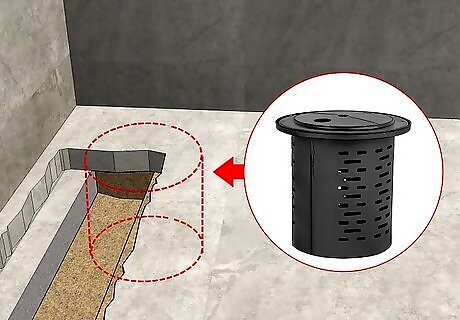
Create a hole for the basin so that the top is flush with the concrete floor. The size of your basin will depend on your system. Typically, 30 inch (76 cm) basins are ideal for anything 120 feet (37 m) or less, 36 inch (91 cm) models are best for systems over 120 feet (37 m), and 2 basins are used for drains longer than 180 feet (55 m). Continue digging downward with your shovel and don't worry if it's a bit bigger than your basin—you can fill it with soil later. Make sure that the top of the hole for the basin is flush with the concrete floor.

Lay down 4 inch (10 cm) Schedule 10 perforated irrigation pipe onto rock. Place down rocks to create a slope down to the basin at least ⁄4 inch (0.64 cm) for each 10 feet (3.0 m). Before laying down the pipe, make sure that the holes are facing down. This slope will bring the water through the irrigation piping to the basin. Don't use rocks smaller than washed river rock—they're prone to getting clogged with sediments and minerals. Purchase a pipe that contains rows of ⁄2 inch (1.3 cm) perforation holes on just one side of the pipe. Attach PVC elbows at the corners afterward.
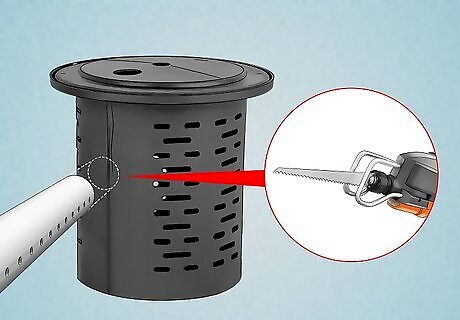
Cut the drain pipe holes in your basin using a reciprocating saw. Use a permanent marker to designate the region where the irrigation pipe meets the basin. For the top hole where the pipe leaves the basin, use the pre-determined guide. Be sure to have someone hold the basin for you while you cut to keep it steady. Hold the blade perpendicular to the basin along a point of the circle and gently press the trigger. Don't worry if the holes aren't perfect. As you cut through the basin, keep your blade speed steady, never cut too fast, and remember that more pressure means faster blade cuts. If the flat "knockout" areas that pre-mark pipe holes don't work for your space, don't use them. Never create holes in the bottom of the basin—water can rise from the bottom.
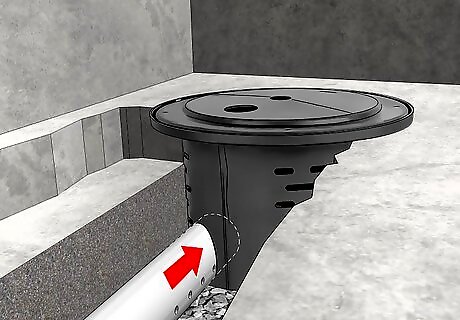
Connect the irrigation pipe to the sump pump basin. Start by laying down the piping onto the sloped rocks. Now, press the male end of the pipe into the hole in the basin about 4 inches (10 cm). Adjust the slope with rocks as necessary as you connect the piping. Fill the space surrounding the piping with river rock up to the concrete.
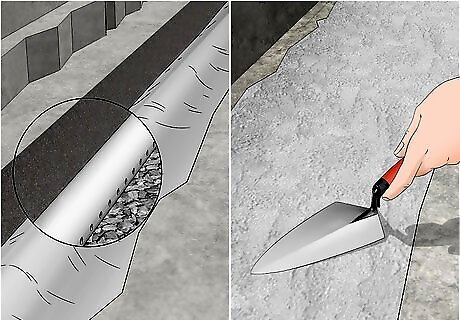
Lay plastic over the rocks and piping and top them with concrete mix. Make sure that the plastic is at least 6-mil thickness to provide an adequate vapor barrier. Pour the concrete into a wheelbarrow and gently tilt it to apply it onto the plastic. Level the concrete with a 3 foot (0.91 m) piece of 2x4 wood after by sliding it along the surface until it is level with the floor. Purchase bagged concrete mix that is designed for sidewalks and slabs. Use the hand float to fill any gaps under existing walls.
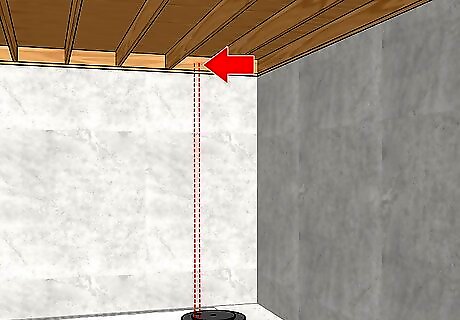
Locate the spot to drill between the rim joists on the inside and outside. This is where the sump pump diverts water to the outside. From the inside, find a clear, undamaged spot between the rim joists, which are the horizontal pieces of wood that provide lateral support for the vertical joists of your floor's frame. After locating it inside, find the corresponding spot on the outside and make sure it's on a downward slope. Make sure you have enough PVC piping to run from the sump pump to your rim joists and outside of your home. Be sure the slope outside your home is at least 2 inches (5.1 cm) for every foot that you move away from the foundation. Always start by adding dirt within a foot of the foundation and make sure the dirt is always 6 inches (15 cm) below the sill plate. Move outward from your home in one foot increments until the slope is 2 inches (5.1 cm) per foot.
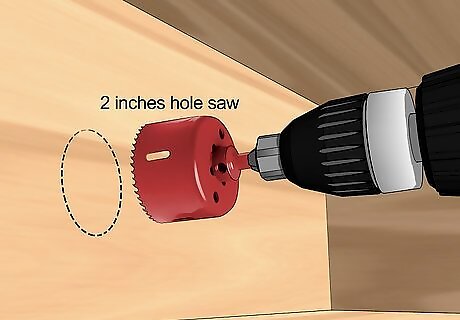
Create a hole between the rim joists using a hole saw. Connect a 2 inch (5.1 cm) drill bit to your hole saw. Grab the drill and turn it on before it touches the surface. As it starts turning, apply firm pressure horizontally into the hole location. Don't press too hard and maintain even pressure for the best results. Check that your PVC piping fits through the hole. If it's too small, drill it a bit larger until it's an adequate size.

Drill a ⁄4 to ⁄8 inch (0.64 to 0.95 cm) hole into 6 to 8 inches (15 to 20 cm) of PVC piping. Place the PVC piping vertically onto a flat surface and face downward with a standard metal drill. Angle the drill bit upward at 45 degrees before you turn the drill on and apply firm pressure. The angle ensures that water sprays downward while the pump works, giving it time to increase its speed gradually before it attempts to force the check valve—which closes to prevent liquid from flowing backward—open. Use metal or wood drill bits, as both work for PVC. Purchase electric drills from home hardware stores.
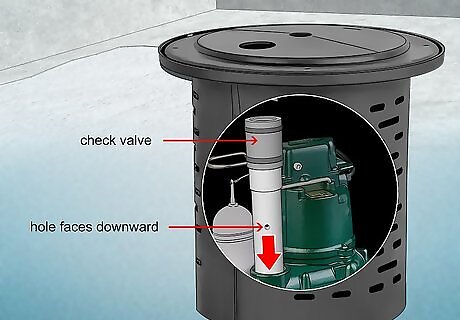
Attach the PVC piping to the pump and connect a check valve on top. Insert the PVC piping with the hole into the pump, ensuring that the hole faces downward. Afterward, attach your check valve. Be sure that the check valve does not interfere with the pump switch, which protrudes from the pump and is connected to the dangling oval float. Don't glue the piping into the valve just yet.
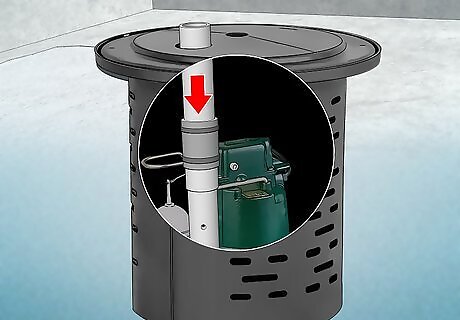
Connect another section of PVC that reaches the basin's top. The second section of PVC must run from the check valve to the top of the basin. From here, it will connect to piping that exits the basement. After connecting the second section of PVC, take one more look at the check valve position and make sure it doesn't interfere with the pump switch.
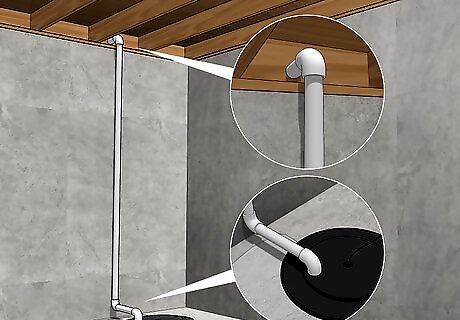
Connect PVC piping between the sump pump outlet and your home's rim joist hole. Check the manufacturer's instructions to determine the appropriate sized piping—most use 1.5 inch (3.8 cm) diameter PVC piping. Start by dry fitting your piping from the sump pump to the hole. After making sure everything fits properly, apply caulk between the seams the seal everything up. Apply caulk to seal the PVC piping after everything is in place. Place the nozzle onto the sealing rim and apply steady, gentle pressure to the trigger. Remember that less is more—you can always do a second run.
Repairing and Diverting Water Leakage
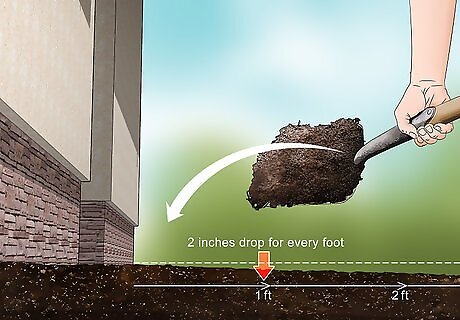
Add dirt against your home's foundation to create a slope. You must ensure that the ground next to your foundation slopes away from your home, not towards it. But backfilled dirt around the foundation will typically settle lower than the surrounding dirt and cause the ground to sink in and slope towards your house. Add dirt up against the foundation to create a drop of at least 2 inches (5.1 cm) for every foot that you move away from the foundation. Make sure that the top of the dirt is at least 6 inches (15 cm) below the sill plate, which is the bottom horizontal piece of the building. This will ensure that there is no ground contact that promotes the rot of building materials. Start by adding dirt within a foot of the foundation, taking care to ensure that it's always 6 inches (15 cm) below the sill plate. From here, move outward in one foot increments until you create a slope of 2 inches (5.1 cm) for every foot.

Clean your gutters and check that downspouts are working. Always clean your gutters 2 times a year—once in spring and once in fall. Start at the downspout and use a garden trowel or your hands to remove large chunks of dirt. In addition, be sure that the downspouts are discharging water at least 5 feet (1.5 m) away from the foundation of your home. Work horizontally from your ladder and move down the gutter. If your home doesn't have gutters, consider installing some or hiring a contractor to do so. This will ensure that water is properly diverted from your home.

Remove plants that are fewer than 12 inches (30 cm) from the foundation. Watch out for shrubs and other plants that are too close to your foundation. Rotted roots can create a path for surface water to flow down to your foundation. Use a shovel to dig in a circle around the roots of each plant—cut through as many of them as you can! Afterward, insert the shovel underneath the roots as far as possible and lever the plant out of the soil. If you plant anything new, always try to plant them on the slope around your home to direct water away from your foundation. Destroy as many of the roots as possible to prevent regrowth.


Comments
0 comment