

Planning the Fence Layout

Call the city’s zoning department to find the property lines and fence laws. Reach out to your local government’s zoning department and tell them that you want to build a fence. Give the department the address of your property so they can tell you where the edges of your property line are. They will also let you know if there are any rules for your fence, such as the maximum post height allowed. Take notes while you’re on the phone so you don’t forget any of the regulations you need to follow. Most fences don’t require a building permit, but ask the zoning department if you need one.

Have utility services mark underground lines on your property. Contact your local water, gas, and electric companies at least 3 days before you want to dig so they have time to visit your property. Tell the companies that you plan on digging on your property and give them your address. Within the next 2–3 days, workers from the utility companies will come to your property and paint lines on the ground where there are pipes or wires underground. If you live in the United States, you can call 811 to reach your utility companies.

Sketch the layout for your fence on your property survey. A property survey is a detailed blueprint of your entire property and is usually with the closing paperwork for your home. Make a copy of the property survey and draw the layout for your fence on it with a pencil and straightedge. Draw the fence design proportionate to the rest of the property survey so you can see how long it will be and how many materials you need. If you don’t have a copy of your property survey, talk to the attorney or realtor that closed the sale of your home. If you aren’t able to make a copy of your property survey, place a piece of tracing paper over it before you start drawing.Tip: Leave at least 6–12 inches (15–30 cm) between your fence and the edge of your property so you don’t encroach on your neighbor.
Staking the Fence’s Perimeter
Drive stakes into your yard for the corners and end posts of the fence. Look at the plan for your design and locate where your fence has 90-degree corners or comes to an end. Push a wooden stake into the ground so it’s 2–3 inches (5.1–7.6 cm) past where you want the center of the post. Extend a measuring tape from the stake to the nearest corner or end post and push in the next stake. Continue around the perimeter of the fence design placing stakes. You can buy wooden stakes from a home improvement store. Don’t place the stakes where you want the centers of the posts since they will be in the way later on.

Tie mason string between the stakes so it’s 6 in (15 cm) high. Loop a piece of mason string, which is a long spool of thick cord, around the stake so it’s 6 inches (15 cm) off the ground and secure it with a knot. Pull the string tight and extend it to the nearest stake marking a corner or end post. Cut the piece of string so you have 3 inches (7.6 cm) of excess and tie it tightly around the second stake. Continue tying new pieces of string between the stakes so it’s taut. You can buy mason string from your local hardware or home improvement store. If you don’t have mason string, you can also use twine instead. Keeping the string 6 inches (15 cm) off the ground will help you measure your posts to ensure they are the same height.
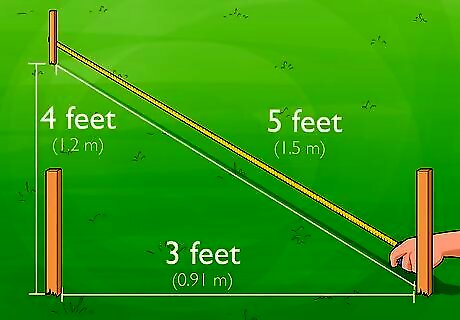
Check if the corners where the strings intersect are square. Measure 3 feet (0.91 m) down the string from a corner stake and mark the location with a piece of tape. Then measure 4 feet (1.2 m) down the piece of string perpendicular to the first one and place a piece of tape on it. Extend your tape measure between the pieces of tape to see if it measures 5 feet (1.5 m). If it doesn’t, move the corner stake over by ⁄2–1 inch (1.3–2.5 cm) before checking the measurement again. The distance between the pieces of tape should be 5 feet (1.5 m) since the corner and the pieces of tape form a right triangle, which you can easily calculate the side lengths using the Pythagorean theorem. The theorem states a + b = c, where c is the longest side opposite of the corner. If the sides a and b are 3 and 4 feet (0.91 and 1.22 m), then the equation would be (3) + (4) = c. Simplify the equation to 9 + 16 = c. Take the square root of each side to get √(9 + 16) = √c. Simplify the equation to √25 = c. This means that c should equal 5 feet (1.5 m).

Stake the post locations every 6–8 ft (1.8–2.4 m) along the string. Start from one of the stakes marking an end post or corner, and extend your measuring tape to 6–8 feet (1.8–2.4 m). Push a wooden stake into the ground so it’s about 2 inches (5.1 cm) on the outside from the string. Continue working around the perimeter of the string and adding new stakes for each of the fence posts. Don’t put the stake against or underneath the string since it will get in the way later on. Avoid following the slope of the ground when you measure the post distance since you may get inaccurate measurements. Keep the measuring tape horizontal while you’re working.
Digging the Post Holes

Buy outdoor-treated posts and boards for your fence. Avoid getting lumber that hasn’t been treated for outdoor use since it’s more likely to rot or deteriorate. Use 4 in × 4 in (10 cm × 10 cm) fence posts that are around 6–8 feet (1.8–2.4 m) long depending on the height for your fence. Choose 2 in × 4 in (5.1 cm × 10.2 cm) or 2 in × 6 in (5.1 cm × 15.2 cm) boards that are 8 feet (2.4 m) long to span horizontally between your posts. If you can’t afford all of the materials for your fence, buy enough to work on a 8–16 ft (2.4–4.9 m) section at a time. Divide the perimeter of the fence by 8 feet (240 cm) and multiply by 3 or 4 to find the total length of boards you need for the rails. For example, if the perimeter of your fence is 100 feet (30 m), then 100/8 = 12.5, which means you need 13 boards for 1 rail. To make a fence with 3 or 4 rails, you would need 39 or 52 boards respectively.

Use a post hole digger to make holes that are 30 in (76 cm) deep. Post hole diggers have 2 shovel blades that clamp around a section of soil so you can pull it out of the ground. Push the end of the post hole diggers into the ground where you want the center of your post. Pull the handles apart to grip the soil and pull the diggers straight out of the ground. Cut each hole so it’s at least 30 inches (76 cm) deep and 12 inches (30 cm) in diameter. You can buy post hole diggers from your local hardware or outdoor supply store. If you want to finish the job quicker, check your local hardware store for earth auger rentals, which drill through the soil and excavate it quicker. Keep the auger perfectly vertical while you drill into the ground.
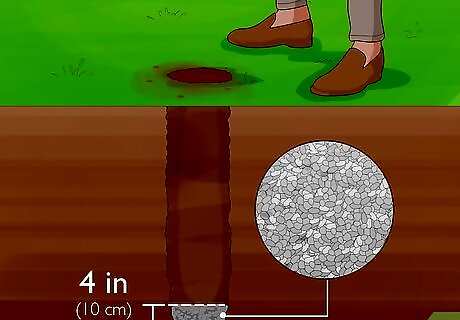
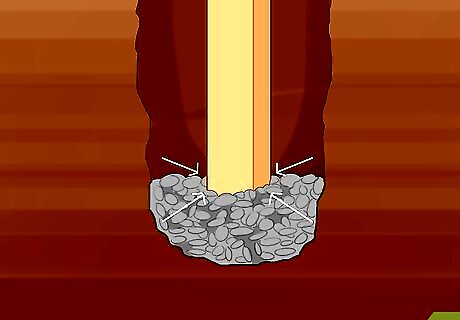
Fill the bottoms of the holes with 4 in (10 cm) of gravel. Gravel prevents water from collecting at the bottoms of the fence posts so they don’t develop rot. Pour the gravel directly into the hole or use a shovel to scoop it into the hole. Spread the gravel evenly in the hole so it forms a sturdy surface for the post. You can buy gravel from your local hardware store. If you have slow-draining soil or soil with a lot of clay, use 6 inches (15 cm) of gravel instead to improve drainage.
Setting the Posts
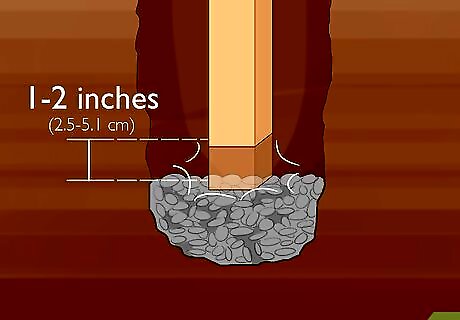
Tamp the surface of the gravel flat with the end of a fence post. Guide the narrow end of the fence post into the hole and carefully lower it onto the gravel. Pick the fence post up 1–2 inches (2.5–5.1 cm) and repeatedly tap the surface of the gravel. Work your way around the hole as you tamp t to flatten the gravel and provide a level surface for the fence post. You can also use a tamper to compact the gravel if you have one.
Set a post in the center of a hole so it’s level. Guide the post so it sits in the middle of the hole and so the edge is parallel to the string. Secure a post level, which checks the vertical and horizontal levels at the same time, to the top of the fence post and check the reading. Move the top of the post to adjust the level and hold the post in place once it sits perfectly in the hole. You can buy post levels from your local hardware store. You may use a standard level if you want, but you’ll need to reposition it check the horizontal and vertical levels each time. Work on 1 fence post at a time so it’s easier to support and brace.
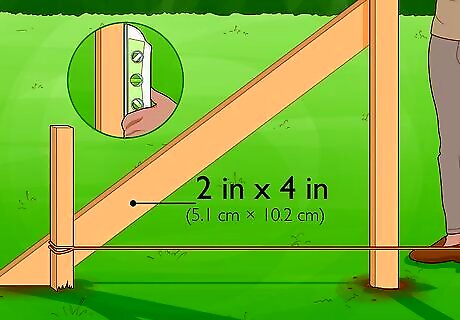
Brace the post with 2 in × 4 in (5.1 cm × 10.2 cm) boards to keep it vertical. Place the end of a 2 in × 4 in (5.1 cm × 10.2 cm) board against the ground and lean it at a 45-degree angle toward the post. Pound 2 nails that are 3–4 inches (7.6–10.2 cm) long through the board and into the post. Place another board on the opposite side of the post so it doesn’t shift anymore. If your fence post is on a slope, brace the post on the lowest side so it doesn’t tip over or lean.Tip: Ask a helper to hold the post so it stays level while you attach the braces to the sides.
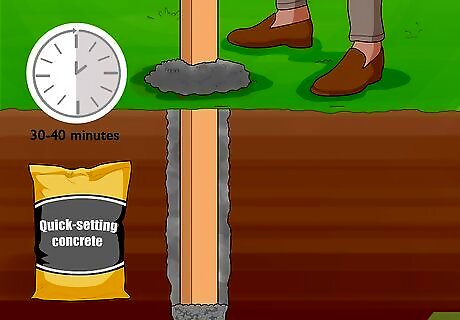
Fill around the hole with quick-setting concrete. Quick-setting concrete starts drying within 30–40 minutes so your fence posts are less likely to move or shift. Slowly pour the concrete mix directly into the hole until there’s 3 inches (7.6 cm) of space between it and the ground surface. Then add 1 gallon (3.8 L) of water for each 50 pounds (23 kg) bag of concrete you used. Pour the water slowly so it soaks into the concrete powder and starts setting. Buy quick-setting concrete from your local hardware store. To fill a hole that’s 30 inches (76 cm) deep and 12 inches (30 cm) wide, you usually need 4–5 bags that are 50 pounds (23 kg), but it will depend on the instructions on the label.

Let the concrete cure for 4 hours before removing the braces. While the concrete will start hardening within 30 minutes, it takes more time for it to cure through to the middle. After the concrete cures, use the back of a claw hammer pry out the nails holding the braces against the posts. Start setting other posts while the concrete dries so you don’t lose any time while you’re working.
Installing the Rail Boards
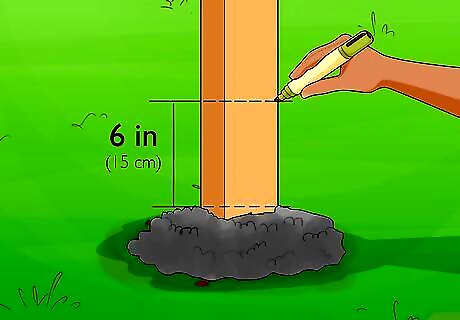
Mark 6 in (15 cm) up from the bottom of each post. Start your measuring tape on the ground and extend it 6 inches (15 cm) up the side of the post. Draw a horizontal line on the post so you know where to place the bottom edge of the lowest rail board. Mark the rest of the posts the same way so you have guide lines. Leaving 6 in (15 cm) of space prevents the wood from developing rot. It also allows livestock to graze underneath the fence without getting their legs or hooves caught. Avoid leaving more than 12 inches (30 cm) between the bottom rail and the ground if you plan on keeping animals enclosed in the fence.

Drill 3 pilot holes 1 in (2.5 cm) in from the ends of the boards. Start measuring from the short sides of your 2 in × 4 in (5.1 cm × 10.2 cm) or 2 in × 6 in (5.1 cm × 15.2 cm) boards. Use a drill bit that’s ⁄8 inch (0.32 cm) narrower than the diameters of the screws you’re using. Place the first and second holes so they’re ⁄2 inch (1.3 cm) in from the long edges. Position the third hole so it’s in line with the other 2 holes. If you don’t drill pilot holes, you risk splitting the wood and ruining the piece of your fence.
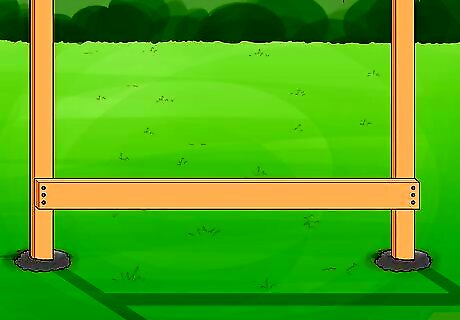
Screw a board between 2 posts so they’re just above the marks. Ask a helper to support one end of the board while you secure the other end to the first post. Position the end of the board so it’s in the center of the post and the bottom edge lines up with the marks you made. Make sure the board is parallel to the ground before driving 4 in (10 cm) weather-resistant screws into the holes with a drill. Tighten the screws on 1 end of the board before attaching the other end to the second post. If you don’t have a helper, prop the other end of the board up by 6 inches (15 cm) so you don’t screw it in at an angle. Don’t cover the entire thickness of the post with the end of the board, or else you won’t have room to install the rails extending from the other side.Tip: If you’re building the fence as decoration, place the horizontal boards on the sides of the post that face away from the property. If you plan on keeping livestock in the fence, put the boards on the inside of the posts so the animals are less likely to break the boards if they apply too much pressure.
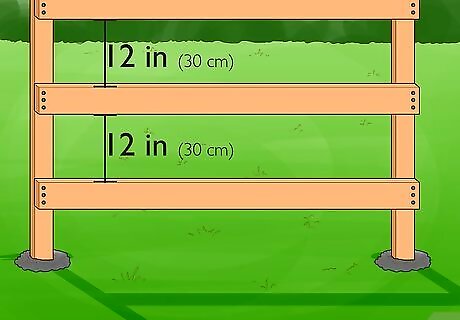
Add more boards so there’s 12 in (30 cm) between them vertically. Measure up from the top of the first board you attached between the posts so there’s 12 inches (30 cm) of space and mark it with your pencil. Hold the next rail board against the posts so they line up with your marks and screw them into the posts. Continue screwing boards up the posts until you reach the top. Avoid leaving more than 12 inches (30 cm) of space between boards if you plan on keeping livestock since animals will be able to fit their heads through the gaps and reach items outside of the fence. Usually, you will have enough space for 3 or 4 rails on your posts.

Continue adding the rails to the rest of the fence posts. Position additional rail boards so the seams are flush on the posts. Make sure the top and bottom edges of each board stay in line with the ones next to it so your fence has a clean appearance. Work your way around the perimeter of the fence so each post has 6–8 boards screwed into it, depending on how many rails you have. If the ground slopes between the fence posts, cut angled miters into the ends of the boards so they still fit flush together.
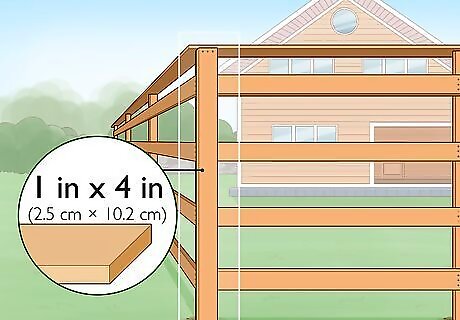
Cover the rail seams with vertical 1 in × 4 in (2.5 cm × 10.2 cm) boards. Stand 1 in × 4 in (2.5 cm × 10.2 cm) boards on their narrow ends and hold them tightly against the ends of the rail boards. Drive 2 nails that are 4 inches (10 cm) long through the board into each of the rail pieces to hold them securely in place. Repeat the process on the rest of the fence posts so the rails don’t come loose. You don’t need to add 1 in × 4 in (2.5 cm × 10.2 cm) boards if you don’t want to, but rails may be more likely to break or warp.


Comments
0 comment